Monday, 29 December 2014

Photography Shoot

I was initially planning on using somebody from the college football team as my model but when he turned up he was wearing his football kit and had no other clothes available, I had to ask somebody from the class to model for me as a last minute thing. The reason I chose the person I did from my class is because they wear clothes that you would find on the website I am choosing to photograph for and they aren't camera shy and are easy to work with so for this reason, I got what I needed from the shoot. However, I am disappointed that I had to find somebody else last minute. I didn't have any outfits for Michael to change into but what he was wearing was suitable and represented the website very well I feel.

 I think these photographs turned out well and are very much like the ones you would find online for Topshop/Topman. I think they could be really useful for catalogue photography, as the background is plain, there is nothing extreme about the photograph, his facial expressions are just neutral and he is wearing casual clothing.


I have chosen a photograph from Topman website to compare between the photographs I took myself and personally, I feel they are very similar which is why I am happy with the outcome, although the photos from the website, you cannot see the models face completely, comparing the stances and facial expression they are almost identical. The photograph on the right with Michael looking slightly off centre, is the exact same pose as the model for Topman is doing and you can see about the same amount of clothing on each one. Although this wasn't planned, I knew what I was trying to achieve with my photographs, showing just part of the clothing but all of Michael's face. I am happy with my results, especially now I have found that photos from the website I am going to be using, are very similar to the photos I have produced myself.




Lighting Set Up


For my lighting set up diagram I used www.lightingdiagrams.com to show how I set up the studio for my shoot. I used a white background as the photography I was doing was catalogue and I used softboxes to soften the light and make the subject brighter and the main focus. I was stood infront of the model to get head on photographs and had softboxes either side so the light was even. The set up is simple but effective for the photographs I am trying to achieve.

Studio Lighting

Honeycomb Grid
A honeycomb grid is used to create a very tightly focused light with as little diffusion as possible. It is good to use for still life photographs in particular because the light is focusing on one particular object.


Snoot
A snoot is a tube that is attached to a light and directs the light wherever you want it to be, almost like a spotlight, this would be good for portrait photography or still life as it can focus on any subject you are photographing.


Barn Doors


Barn doors have four hinged sides around the bulb and they can come in different sizes. They are just used for shaping the light and do not have any affect on the softness or hardness of the light.


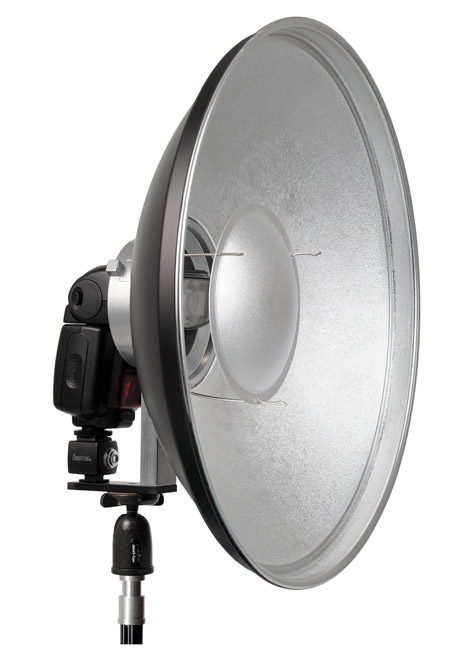
Beauty Dish
A beauty dish is a large dish shaped dish placed onto the light and acts as reflector and focuses the light on the subject of the photograph, it also helps block out imperfections from the models face.


Reflectors
A reflector is used to direct the light onto a certain subject or object, reflectors come as either large boards or small lamp reflectors.


Soft Box
Soft boxes are always useful and are used to evenly light the subject/object. I tend to use a soft box for the majority of my shoots as they are really good for getting the correct light and softening it also.


Backdrop
Backdrops will always be used when shooting in a studio, they come in various different colours, designs and sizes. E.g infinity curves, paper backdrop and fabric. A backdrop is the perfect way to make your photograph, depending on what colour you use, you can give off completely different feelings to the photograph just because of the colour of backdrop.

Friday, 26 December 2014

Research

Research

Fashion photography can be done in many different ways, either in a studio or on location. It focuses on many different things including the make up, clothes, shoes and accessories. By researching I have found lots of different photographic techniques and styles with all the results varying.


Catalogue

Catalogue photography is based on the clothes alone and is for information purposes to show people what they are buying. The background will almost always be simple to keep your focus on the model and the clothes she is wearing, a studio will usually be used but this can be done on location. You usually would shoot wide open to blur the background and keep the model in focus. The models make up and hair will be kept natural and simple.


Editorial

Editorial photography is usually done on location rather than a studio and the photos are not posed, the make up and hair will usually be much more extreme. The model will appear to be 'interacting' with a lifestyle and this type of photography is more commonly used for magazines.

High Fashion

High fashion photography uses models that are tall and slim, like runway models. The make up and hair is usually always very powerful and extreme, although it would never been seen in real life as it is photographed.

Monday, 15 December 2014

Project Plan

Intentions
My intentions for this project are to create fashion based photographs to advertise clothing and accessories for websites like Topshop. This is going to be based on all the types of clothing sold by Topshop which varies but is mainly modern. I am planning on taking these photographs in the next few weeks so I have time to photoshop them as well.

Equipment
For these photographs I will be using the white background to give off a clean look, also so the clothes can be seen more clearly. I will use soft-boxes and possibly the beauty dish, I will also be using my own camera and the flash sync and
possibly the tripod for some of the photographs.

Model/Assistants
I plan on asking the performing arts students to model for me and I will give them some of my shots for their portfolio and for future use. I will also go to the hair and beauty department and ask the students if they would do the models hair and make up for me. In exchange for this I will also give them some photos for their portfolio and to show people what they're able to do. My friends will also be assistants, by helping me with the lighting etc.

 Risk Assessment 
In the studio, there are many risks that can be avoided. There is the risk of tripping over the backdrops, which can be avoided if it is placed neatly and everyone is aware where it is, also the wires from the lights should be placed out of the way so there is no risk of anybody tripping over them. There is also a risk of people burning themselves on the lights because they heat up very fast and become extremely hot. If everybody is aware of this then that already reduces the risk of it happening. If any of these things do happen, it is good to be aware of the closest first aider and also make sure any incidents are reported.                                    


Thursday, 2 October 2014

Shutter Speed Experiment

Experiment 1: Camera Shake

The shutter speed in the blurred pictures is set to 1/30 which is slow, I then shook the camera at the same time as taking the picture which gave it the blurred effect. Personally, I don't like these pictures because of the blur and it just doesn't look like a good quality picture as it's not in focus.
For the clearer picture I used a faster shutter speed, 1/600 which meant I could make sure the picture was more focused and clear which I think turned out much better than the others.


Experiment 2: Abstract Motion Blur

For this experiment, I set my camera to shutter priority and set the shutter speed to 1/8th second. There was 4 parts to this experiment. The first thing we had to do was take a picture of somebody whilst zooming the lens, the second was to take a picture and rotate the camera at the same time, thirdly take a picture whilst shaking the camera and the fourth was to take a picture whilst zooming and rotating the camera. I think that my pictures were successful as it created the right effects and the right sort of blur.


Experiment 3: Light Painting

For this experiment I went into the studio and turned all the lights off as you need complete darkness for light painting to be successful, for this I set my camera to Manual and the bulb setting with my aperture on f8. I then used the light on my phone to write my name and some other peoples names who were in my group. My photos were successful as you can clearly read the images and what they're meant to say. Light painting is fairly easy if you know how to use the right settings on your camera.


Experiment 4: Ghosts


For this experiment, I had to use the classroom, I set my camera to Shutter Priority with a shutter speed between 4-8 seconds. I had to use a tripod for this experiment as the camera needed to remain absolutely still. There was four different stages to this experiment, first of all the person in focus had to rush out of the shot. Secondly, I had to repeat the first step but changing the shutter speed then for the third step, I had to make the person appear more transparent, like a ghost. Lastly, I had to make the person appear more bold in the photo, I think my photos were successful because they turned out how they needed to. 


Experiment 5: Frozen Motion

For this experiment I had to be outside, I needed a fast shutter speed so I used 1/500th second. I then took a picture of somebody jumping off the steps outside college and because of the fast shutter speed, it froze the motion and captures him in mid air. The second photo I took was of the same person but running this time and again, the motion was frozen. I think my photos were successful because the experiment was based on freezing a motion and that's what my photos did.

Experiment 6: Panning

This experiment was the last one and for this I set my camera to shutter priority and used a shutter speed of 1/30th second. This involved taking a picture of somebody running but rather than holding the camera in one position, you had to follow them with the camera to create the panning effect. It shows exactly what is happening in the photo but with a blurred effect to show movement. I think my photo is successful but if I had the opportunity to take it again, I would try to make the image sharper and less blurred.